Creating the life you dream of, one essential oil at a time. Your complete guide to everything Young Living Essential Oils. Located in Dallas, Texas, USA.
Supplies for POO-Pourri Spray Witch Hazel (At your local grocery or online here) Vegetable Glycerin (I got mine at Hobby Lobby, but you can also find it here) 4 oz…
Supplies for POO-Pourri Spray
Witch Hazel (At your local grocery or online here)
Vegetable Glycerin (I got mine at Hobby Lobby, but you can also find it here)
To begin, measure out 1/3 cup of Witch Hazel in a measuring cup.
Then add 2 tbsp of Vegetable Glycerin. Mix together and pour into your spray bottle.
Finally, count out 30 drops of essential oils add them directly to the spray bottle.
Here are a few of my favorite smell combos!
To Use
Shake the bottle vigorously and spray the toilet bowl several times BEFORE you go!
The POO-Pourri Spray will trap the odor in the bowl and leave your bathroom smelling fresh and clean!
I’m headed out of town this weekend with friends and I am excited to take this POO-Pourri Spray along! Just remember to spray Before You Go, So No One Knows!
Disclosure: Please note that some of the links in this post are affiliate links and if you go through them to make a purchase I will earn a small commission.
Essential Oils during a nice hot bath sounds wonderful in theory but if you are anything like me, taking the time to draw a bath is not on the priority…
Essential Oils during a nice hot bath sounds wonderful in theory but if you are anything like me, taking the time to draw a bath is not on the priority list. For my day to day, a nice hot shower is the go-to so adding this Essential Oil Shower Melt to the mix made total sense!
Such an easy DIY with unlimited aromatherapy options, I might be obsessed!
Next, add 1/2 cup of Epsom salt to the bowl. Then slowly add water to the mixture and mix together until it becomes clumpy (2-3 tablespoons of water).
Once the mixture is even, add 20-25 drops of your favorite essential oil blends.
Finally, scoop the mixture into a silicone baking mold/ice tray/mini-muffin pan. Press firmly in the mold and allow to dry for 48+ hours.
Once dry store in an airtight container. I repurposed a Bath & Body Works 3-wick candle jar and it works great! (Want tips on how to get the jar sparkling clean? I used tips from Instrupix.com). If you don’t have one of those laying around you could also use one of these.
Before each shower place, one melt off to the side in the basin of your shower (be sure to not place in the direct water stream). As the warm water hits the melt it will release amazing aromas prepping you for a productive day ahead or a peaceful nights sleep.
Here are some of my favorite Shower Melt aroma combinations (remember to pin!) :
Enjoy taking relaxing hot baths? Try this fun Bath Bomb DIY!
DIY Shower Melts - add aromatherapy to your everyday routine using essential oils!
Prep Time10minutes
Servings10
AuthorCarolyn of Handrafted
Ingredients
1cupBaking Soda
1/2cupEpsom Salt
2-3tbspDistilled Water
20-25dropsEssential Oil
Instructions
In a medium bowl mix together baking soda and Epsom salt.
Next, slowly add water and mix well until the mixture is clumpy.
Add 20-25 drops of essential oils and mix thoroughly.
Spoon into silicone mold and press firmly.
Allow melts to dry for 48+ hours before removing from the mold.
Store in an airtight container.
Recipe Notes
For most intense fragrance use in the first month, if longer passes add 1-2 drops of essential oil to the melt before use.
Disclosure: Please note that some of the links in this post are affiliate links and if you go through them to make a purchase I will earn a small commission.
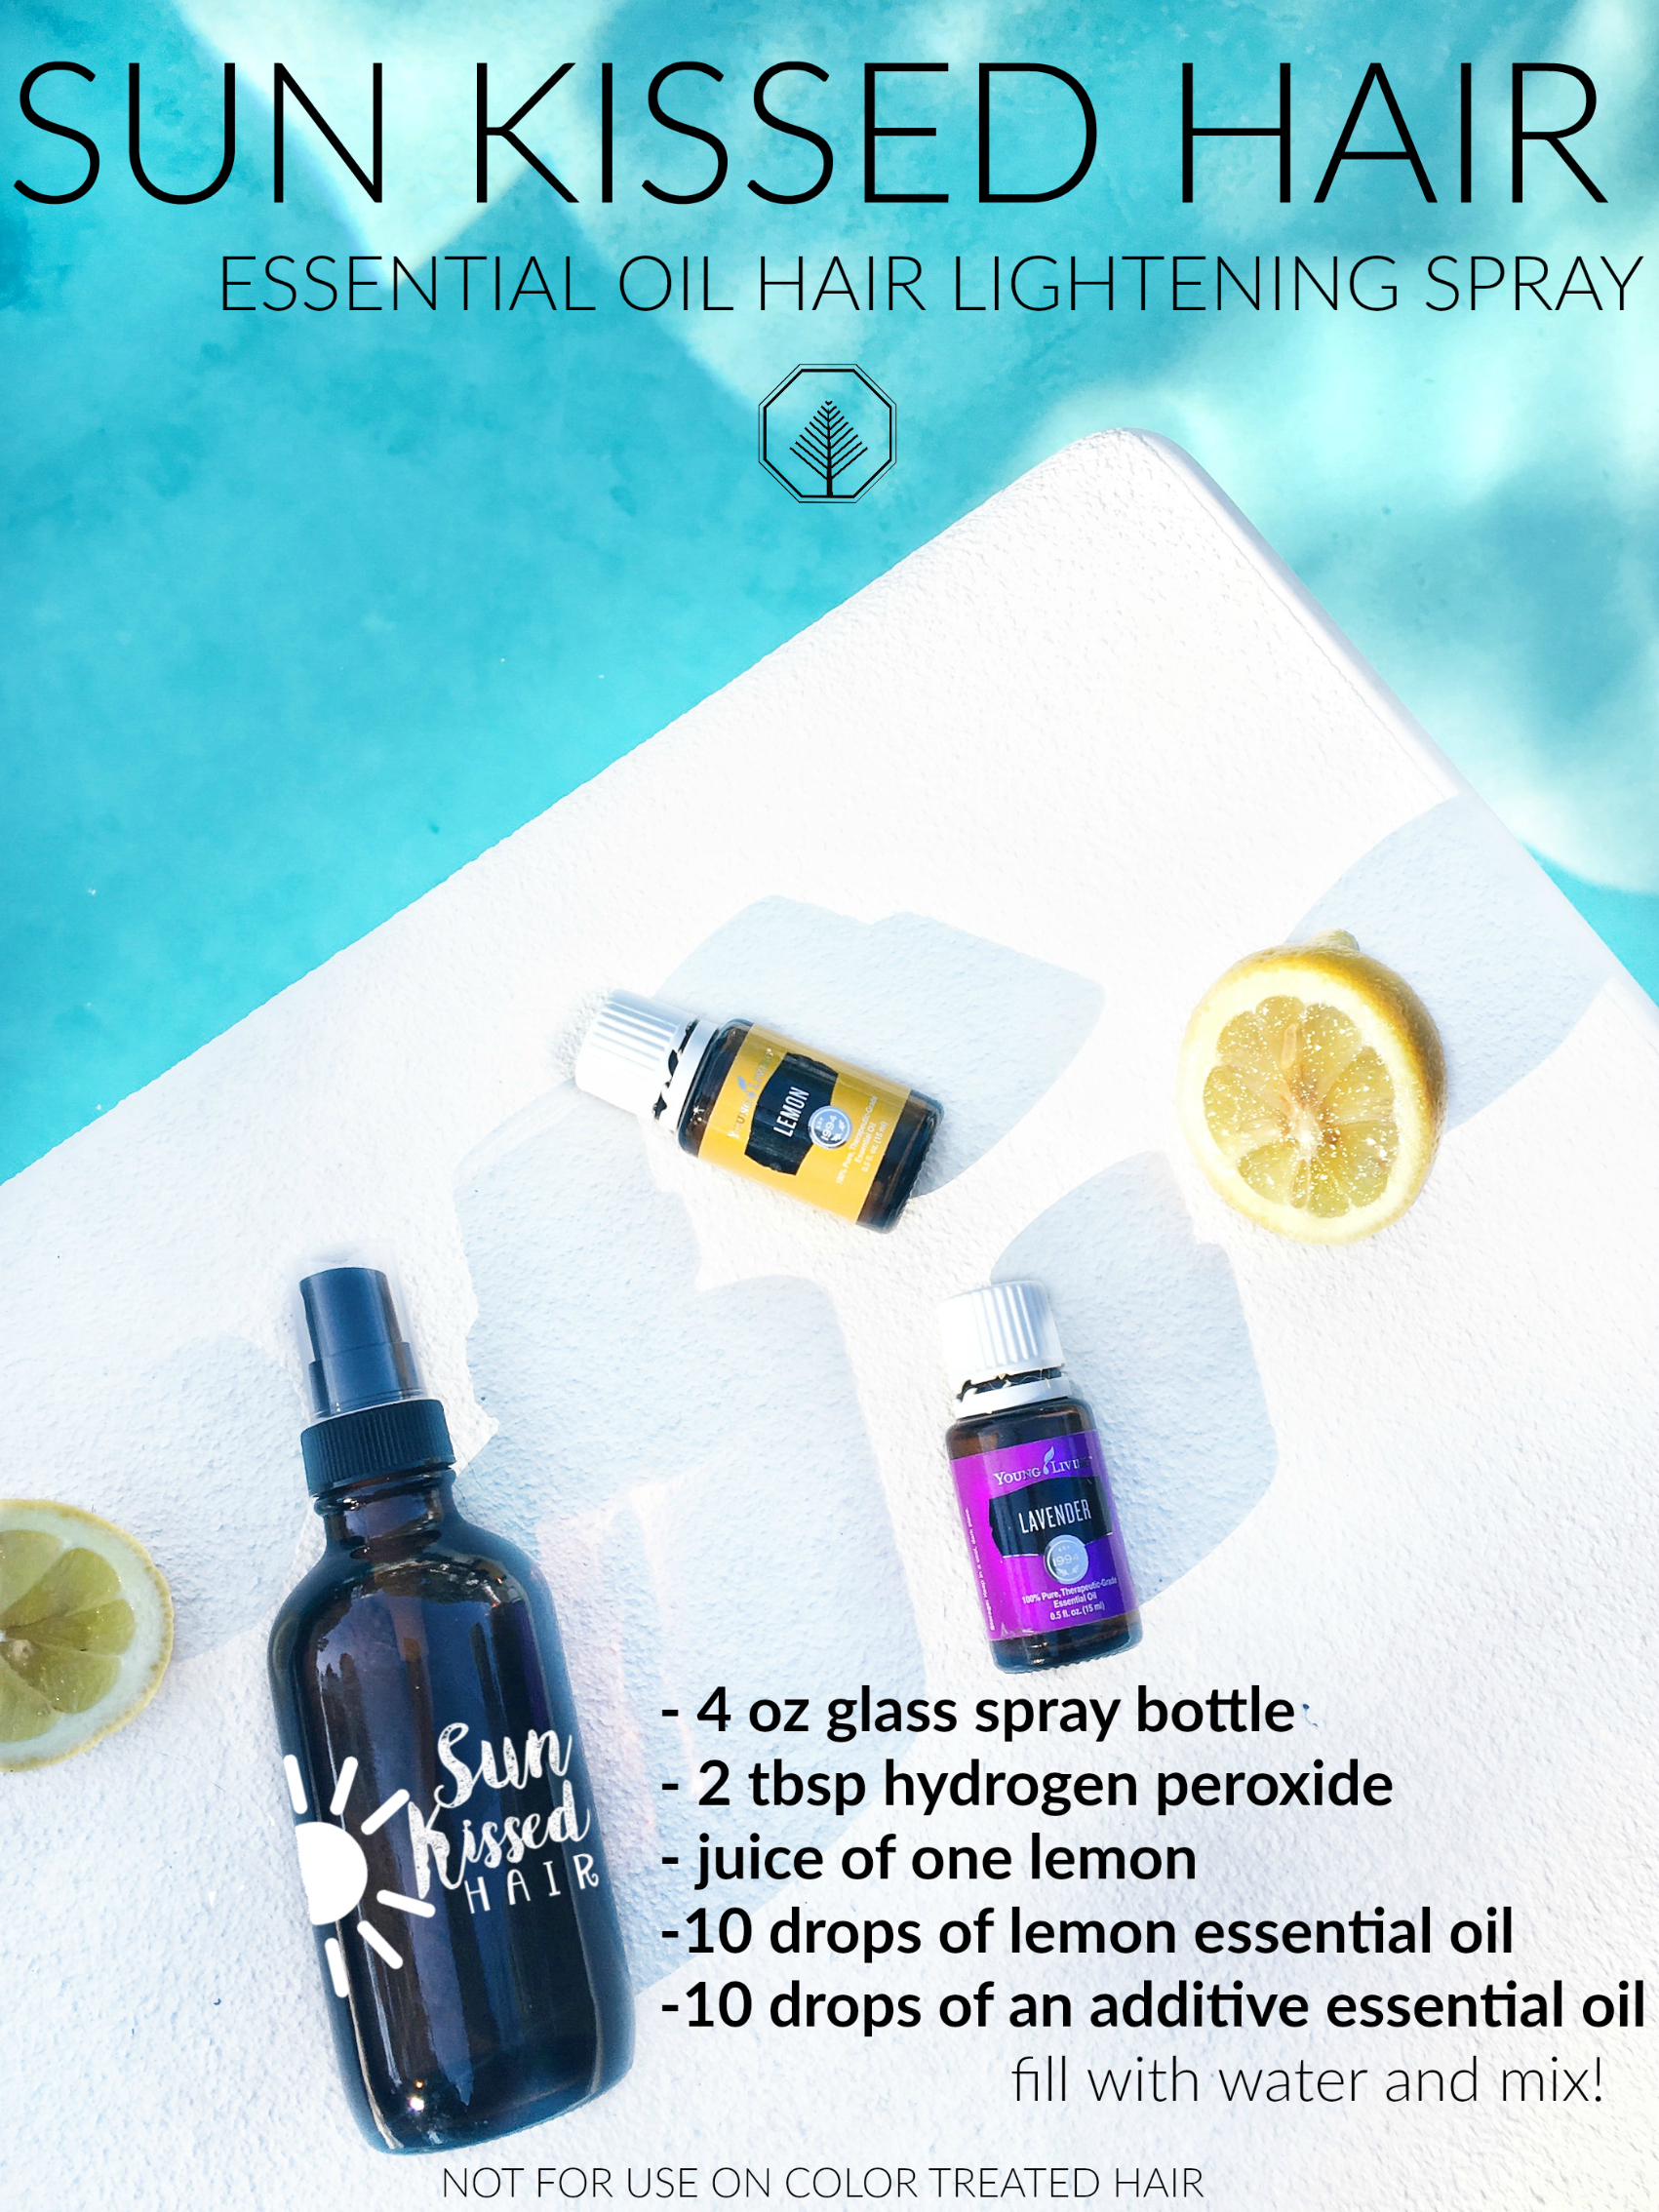
What You’ll Need 4 oz glass bottle 2 tbsp hydrogen peroxide Juice of one large lemon 10 drops of Lemon Essential Oil ORDER HERE 10 drops of an additive Essential…
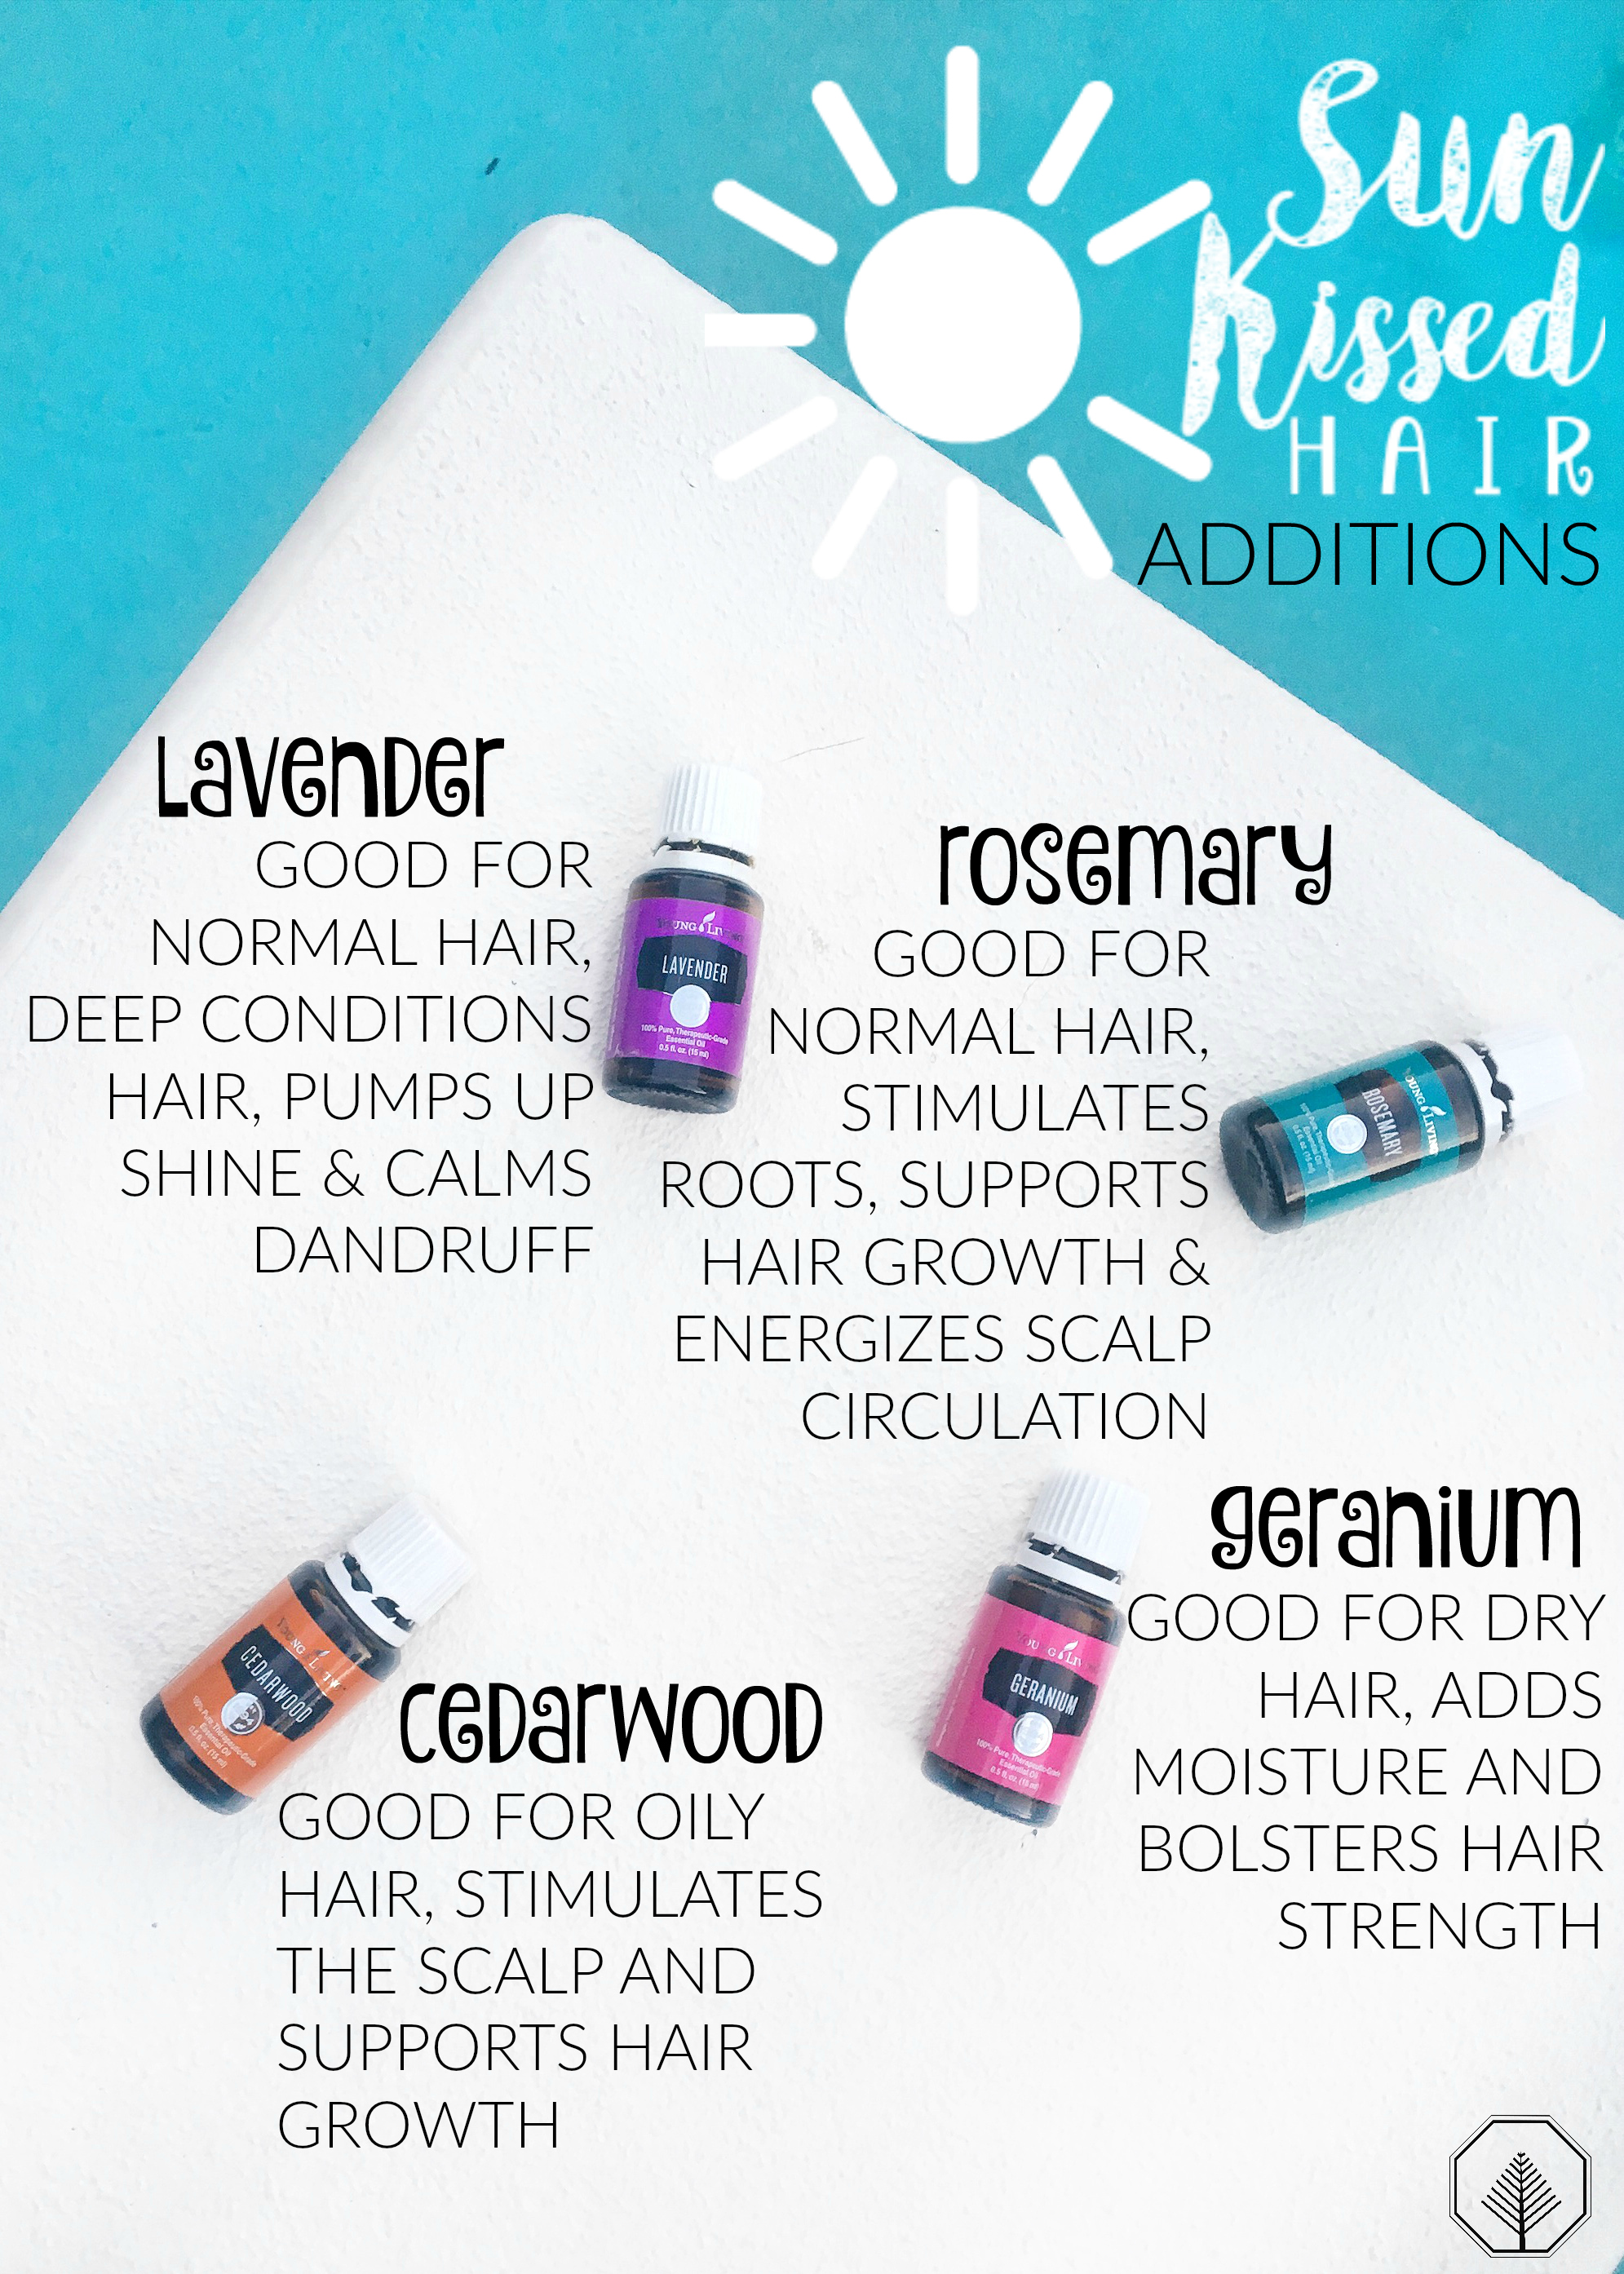
10 drops of an additive Essential Oil (see graphic below for some great options
How To
Begin by juicing one large lemon, strain the liquid so there are no particles to clog the mister. Add lemon juice to the bottle. Next, add the hydrogen peroxide and essential oils. I have normal to dry hair so I opted to add Lavender to my spray. This addition not only smells amazing it deep conditions and amps up my shine! Finally, top the bottle off with distilled/filtered water and shake.
Read through the graphic below to decipher which addition would work best for you this summer!
Use
Use on clean hair and avoid getting the spray directly on the skin or scalp. ** If spay gets on skin be sure to wipe off as these ingredients can increase your sensitivity to sun **.
Spray over hair in the spots you would like to lighten and then sit in the sun allowing for even sun exposure. When applying to my hair I found that spraying and then combing through allowed for the liquid to spread evenly throughout.
Warning
Do not use this formula if you have color treated hair! The hydrogen peroxide and essential oils can react to your hair and cause discoloration! This formula is best used on virgin hair from med brown to blonde shades.
Happy Summer Break!
xo,
-C
Disclosure: Please note that some of the links in this post are affiliate links and if you go through them to make a purchase I will earn a small commission.
Throughout the month of May we are going to work together to get you prepped for summer! 🙌🏼 To start off this #SummerPrep series we are making fun DIY Citronella…
Throughout the month of May we are going to work together to get you prepped for summer! 🙌🏼 To start off this #SummerPrep series we are making fun DIY Citronella essential oil candles! The perfect way to keep your time outside more enjoyable this summer!
Supplies
Natural Soy Wax (I bought this one) – side note; soy wax has one of the highest melting points, this was important to me because my candles will remain outside during the Texas summer
To begin, prepare your wick(s). Using the beeswax hemp wick I tied a knot around a nickel. Then I wrapped two additional pieces of wick around the centerpiece (that’s tied to the nickel). Another way you can do this is to braid in two additional pieces to the center wick. Be sure to make the wick much longer than you think you need.
Next measure the wax chips. For this, I placed the wax chips in my container until it was heaping. I found that the wax melted in such a manner that I needed a full container + 1 cup of wax to fill my candle up evenly.
On the stove, I made a double boiler using a saucepan (with about an inch of water) and a glass measuring bowl.
Add the wax to the glass bowl and turn the heat on med-high. Allow the boiling water to heat the sides of the glass and subsequently melt the wax. Do not melt the wax with direct heat. Stir the wax constantly until completely liquid.
Once liquified remove from the heat and allow cooling for about 5 minutes.
Once cooled add the essential oils. Before completing this project, I scoured the internet looking for ideas on the correct oils to use in an effective bug repellent candle. These three were consistent across the board.
For approximately three cups of wax chips I used:
40 drops of Citronella Essential Oil
20 drops of Geranium Essential Oil
20 drops of Peppermint Essential Oil
Mix the oils and the melted wax thoroughly – I recommend using a popsicle stick to stir. This makes clean up much easier.
To secure the wick, use hot glue and glue the nickel in place. Then using a stick, straw or something similar wrap the excess wick around the stick holding the wick up and centered.
Finally, pour the mixed liquid in the container being careful to not splash the sides or overflow.
Spread these around your outdoor space and enjoy a summer free of pests!
These days it feels like all my creative juices are flowing in two directions: first, anything and everything Dollar Tree and second, toward all the wreaths. I’m not sure why,…
These days it feels like all my creative juices are flowing in two directions: first, anything and everything Dollar Tree and second, toward all the wreaths. I’m not sure why, but I am loving it. This week we are putting together a fun Spring/Easter wreath that would add the perfect floral touch to any front door or interior decoration.
(PS I picked up this adorable ceramic bunny but ended up not using him for the wreath, I did, however, remove the string and wire and place him on the shelf! So cute and expensive looking 😜)
Step 1
If using a gift bag, carefully unfold the paper until it is flat.
Measure the diameter of your selected stove top cover.
Trim your paper to just larger than your needed diameter and affix to your Cricut cutting board.
Then put together your design. Start by adding your circle cut line per your stove cover dimensions. Then add your saying to the center using the font of your choice to create a draw line. Want to click the “easy button” 🚨 Use My Cricut Design by CLICKING HERE.
Once your Cricut design is finished confirm that it fits nicely inside the stove cover.
I wanted the script to stand out more, so I chose to color in the letters using a fine tip Sharpie Pen (this is my favorite). I then glued the finished paper to the inside of the stove cover using a glue stick.
Step 2
Next, we are going to play with the artificial flowers and greenery. The center of my arrangement were these beautiful big peony blossoms. So I first measured how much space the three of them would take on my wreath. From there I started with the greenery. The wire nature of this wreath mold made adding the eucalyptus very easy – I just wove the leaves around it until it was secure.
Next, I worked with the smaller outside flower arrangements. I made each side its own individual arrangement and then secured it to the form using masking tape. (I normally would have used floral tape – but I was out).
Finally, I attached the peony heads to the empty space on the wreath using hot glue (*use extreme caution*).
Step 3
Next, it gets a little more tricky. To attach the stove cover to the wreath form I had my husband drill me three tiny holes. The placement of these holes was in direct relation to the cross-section on the wreath form.
Lastly, I used double ply thread (again would have used the fishing line if I had it on hand) to tie the two pieces together.
This craft could easily be transformed into any holiday or day of the week! Such a fun project!
ChapStick, Burts Bees, EOS, Carmex, Blistex and every random promotional lip balm in between. I love it all. My daughter and I always have chapstick at an arm’s length –…
ChapStick, Burts Bees, EOS, Carmex, Blistex and every random promotional lip balm in between. I love it all. My daughter and I always have chapstick at an arm’s length – in the car, on the nightstand, next to the couch and even in front of my computer. The smooth creamy consistency of chapstick is the best part of this constant ritual. With all of this use comes a surplus of empty tubes. If you don’t believe how many chapsticks I have at once, consider that I thought of this blog post idea and immediately collected FOUR empty tubes from various locations through the house. 😂 No need to plan and collect. 🤷🏻 (I understand it’s probably becoming a problem 🙃).
With all these empty tubes and the endless inspiration that is Pinterest, I set off to refill my tubes and make a better, natural chapstick!
Empty Tubes (you can recycle some of your own or you can purchase new ones here)
There are a million different scent/flavor combinations you could use in your lip balm. Some of my favorites would be:
Lemon-Lavender
Grapefruit-Peppermint
Thieves-Orange (Great for fall and cold/flu season!)
Tube Prep
If you are recycling your lip balm tubes it will take a couple of minutes to prep your tubes. Begin by removing the labels.
Next, clean out the tubes of all remaining chapstick. I first did this by using the tip of a butter knife. Then I rolled the tray all the way back to the bottom of the tube and soaked them in boiling water for a few minutes. Boiling the tubes got most everything else out of the tube.
Recipe
This lip balm is a mixture of Shea Butter, Coconut Oil and Vitamin E oil. I found several recipes that called for beeswax and even one that used raw organic honey. I chose this combination because it is what I had on hand.
First I measured out the Shea Butter and Coconut Oil into a heat safe container. For this recipe, the ratio is 4:1 Shea Butter to Coconut Oil. Once my ingredients were in the bowl I placed it over a saucepan of boiling water to create a double boiler.
While the ingredients were melting I prepped two snack size baggies. For ease of use, I folded them over the tops of two water glasses. My main reason for doing this is because I wanted to try two different scents and I figured “piping” the liquid in the tube would be easier than any other method.
One the mixture was completely dissolved I split it between the two bags. I then set a timer for THREE minutes – this is important! This allowed the mixture to cool to a temperature at which it was safe to add the essential oils. If you add the essential oils too early the heat can cause the oils to evaporate or even reduce their therapeutic qualities.
After the three minute cooling period add 20-30 drops of essential oil to each bag.
To keep my tubes upright I utilized a foam insert that came with some roller ball bottles – it worked great!
Once my oils were added I carefully closed each bag and mixed the liquid around with my fingers. Next, I cut a very small hole in one corner of the snack bag. I then poured the warm liquid through the hole to fill each tube.
To help the liquid set up in each tube I first let them sit upright at room temperature and then threw them in the fridge until hardened.
I did have excess product after filling my four tubes. Instead of trashing the excess (and losing my essential oils!) I had my husband hold additional snack bags while I poured the excess in. I now have two snack bags of reserve lip balm – for the next round of empties. 🙃
Labels
Lastly, I wanted to add a little something to my tubes to help me tell them apart so using my Cricut I cut 1.75″ x 2.25″ rectangles out of vinyl I had on hand. These fit the tubes like a glove!
If you have any questions leave them below! Anyone else have an addiction to chapstick?!


 Once your Cricut design is finished confirm that it fits nicely inside the stove cover.


